

Post by Charlie Dickson on Feb 6, 2009 9:12:33 GMT -5
Some of you seemed to be interested in spey flies so I decided since I’m not doing much fishing (it is three degrees as I write this) I may as well tie some of these up and show everyone how they are done. Keep in mind that my way of doing things is not the only way and there are other great tiers on this board that may do things differently. You can use different color combos to make all kinds of cool looking flies so you don’t need to duplicate what I have done here
Start some thread on a hook. I like the Alec Jackson hooks for this type of fly. This one is a size 1.5.
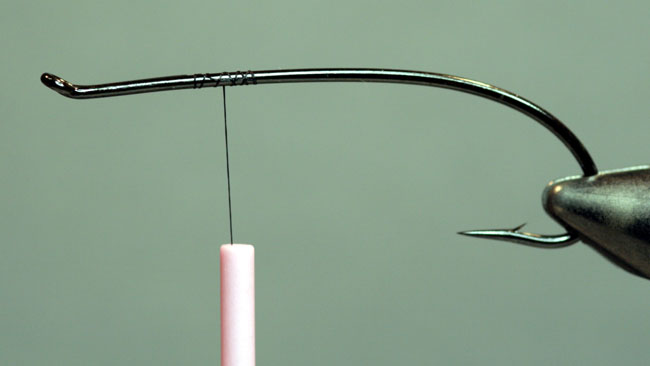
Run the thread back to the hook point and tie in some flat gold tinsel
 Flickr
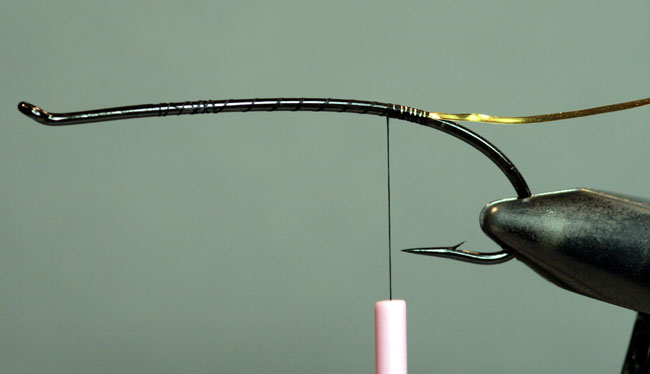
Rap the tinsel foreword, tie it off and trim the excess.
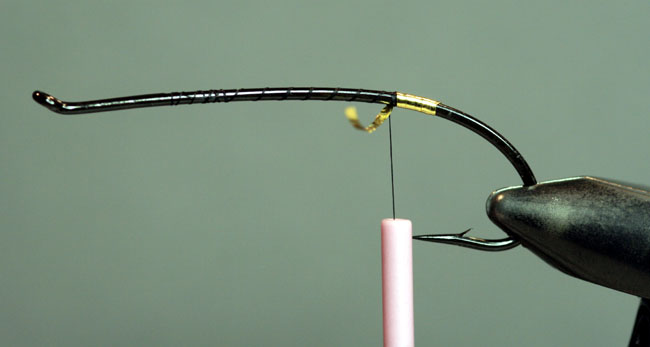
Tie in a golden pheasant crest for the tail. Note: The crest should not extend past the bend of the hook.
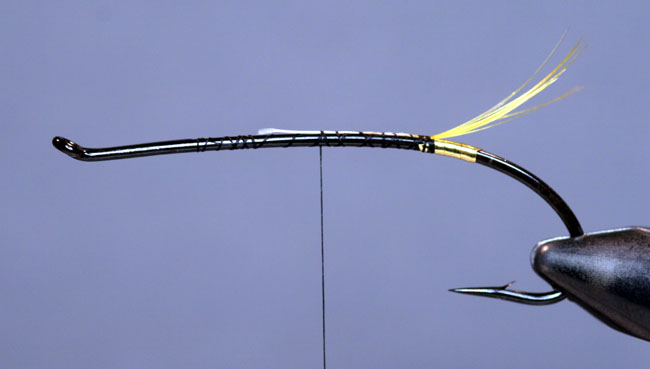
Tie in some black ostrich herl and rap a short butt.
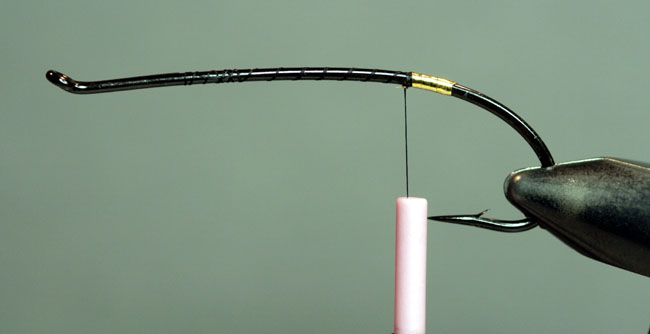
Rap the thread to the front of the fly binding down the rest of the ostrich herl and trim off the excess. Doing this should eliminate small lumps in the body of the fly were the material is cut off.
Next tie in the rib material. I am using a multi part rib made up of black flat braid and a piece of oval silver tinsel on either side of it. Again run the material the entire length of the hook to avoid lumps.

Next tie in some orange floss for the rear half of the body.
Now tie in some flat silver tinsel for an underbody and rap it half way up the hook shank. This tinsel underbody will help keep the floss bright when it gets wet.
Next rap the floss over the tinsel and tie it off
Tie in a piece of fine gold wire. This will be used as a counter rib across the body hackle to keep fish from chewing it off.
Next select a hackle for the body. In this case I am using a blue eared pheasant feather dyed orange. Ring neck rump feathers also make very good spey hackles if you can find big ones.
Stroke the fibers of the feather back and tie it in by the tip. And clip off the excess.
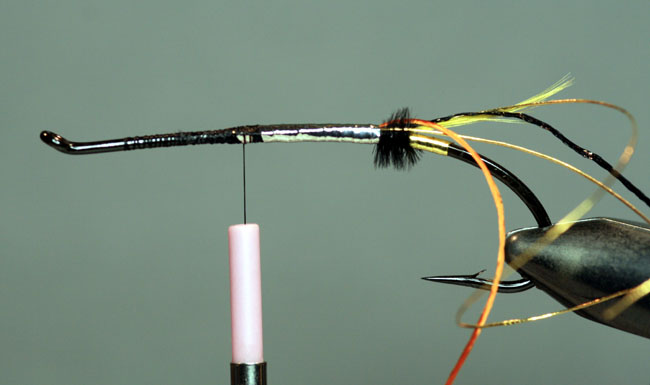
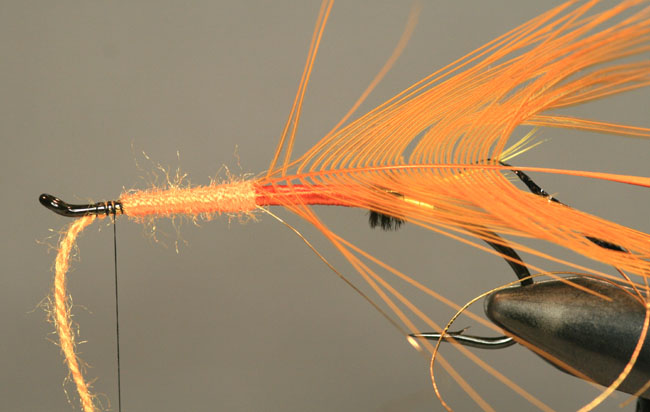
Tie in some fine orange wool yarn for the front half of the body, rap it foreword, tie it down and trim off the excess.
Next rap the black flat braid foreword, tie it off and trim the excess.
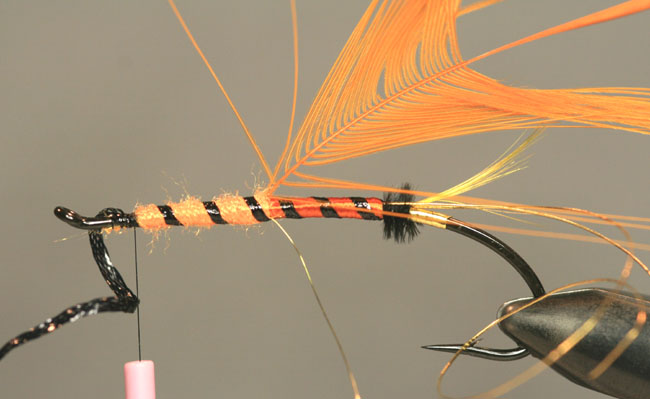
Now rap the oval gold tinsel foreword, one strand tight to the front edge of the flat braid and one tight to rear edge of the flat braid. Bind them down and trim the excess.

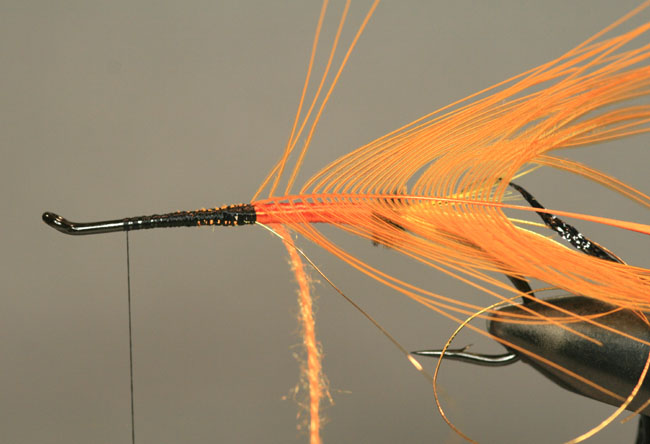
Next grab the body hackle by the stem and hold it straight up.
Stroke the fibers in the direction of the back of the hook and pinch them so they stay that way.
Now rap the hackle towards the front of the hook keeping it between the rib, tie it off and clip off the excess stem.
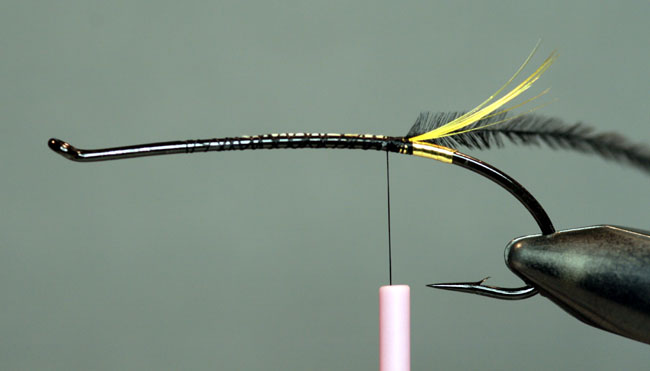
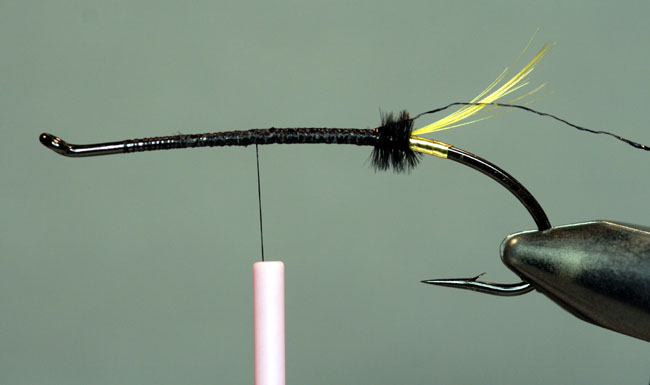
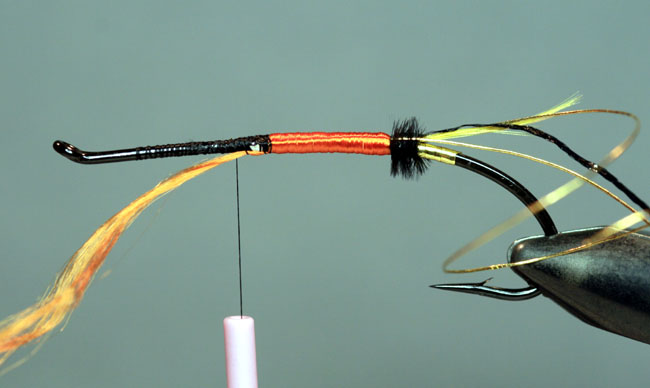
Select a black hackle for the throat. This one happens to be a ring-neck pheasant rump feather dyed black.
Stroke the fibers of the feather back and tie it in by the tip. And clip off the excess.
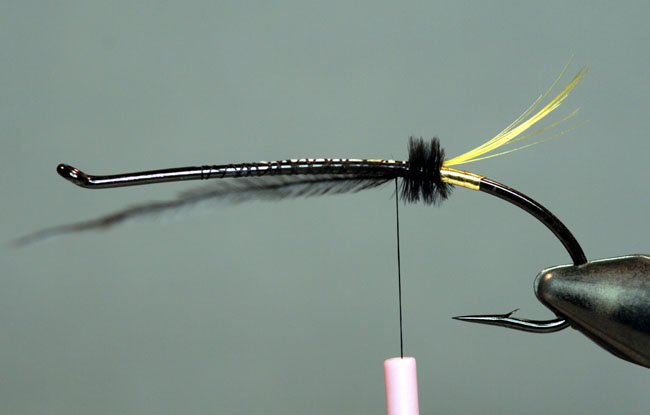
Next grab the body hackle by the stem and hold it straight up.
Stroke the fibers in the direction of the back of the hook and pinch them so they stay that way.
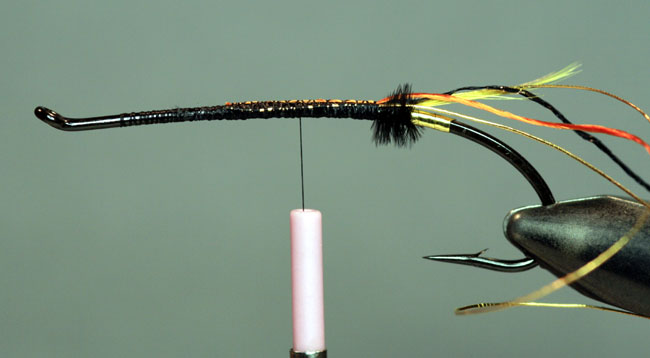
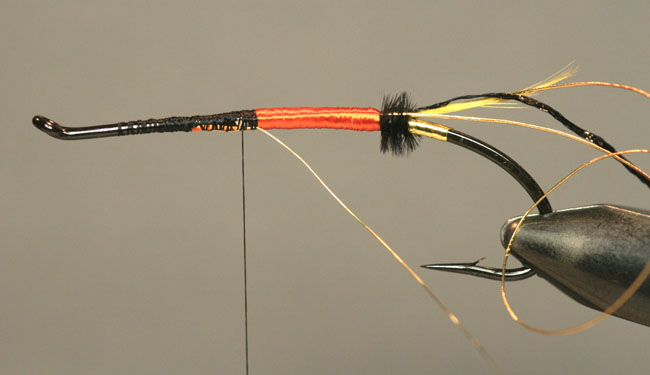
Rap the hackle, bind it down and trim the excess stem.

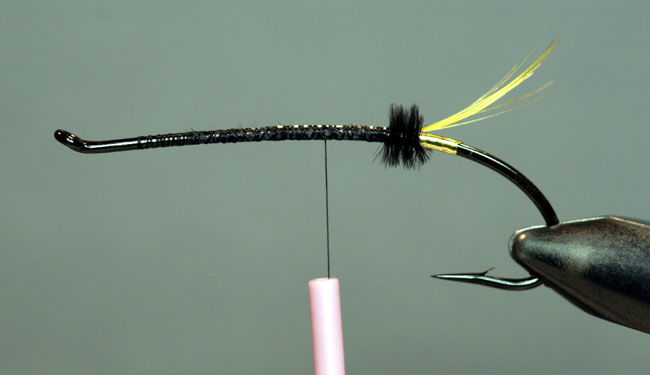
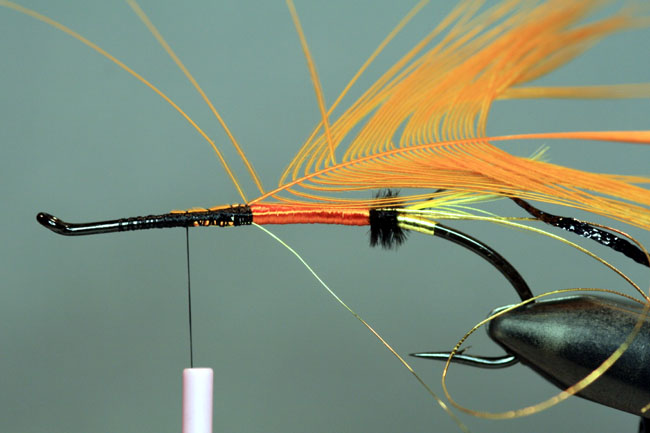
Pull the fibers in a downword direction so that most of them are on the sides and under the fly.
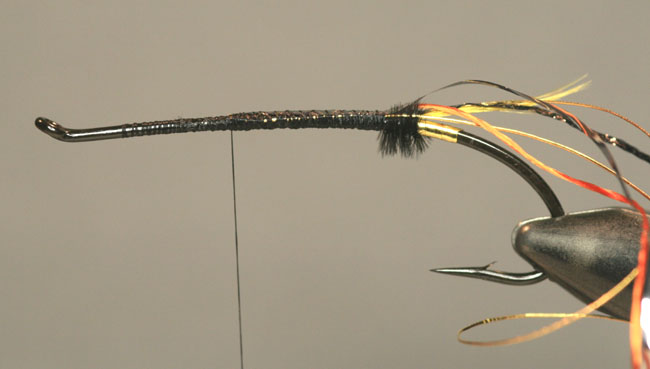
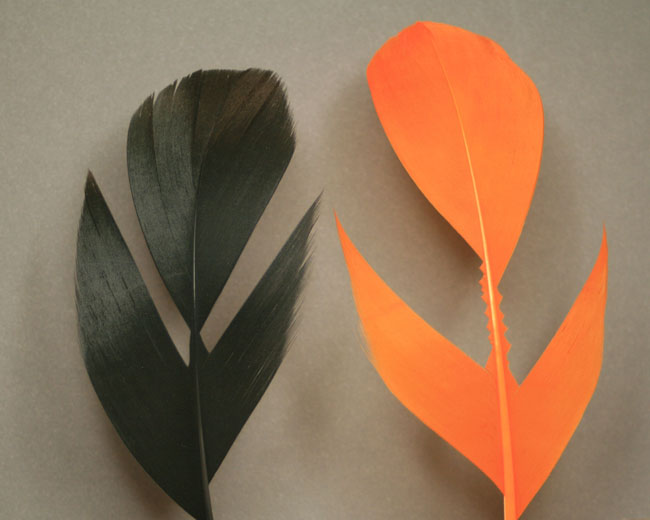
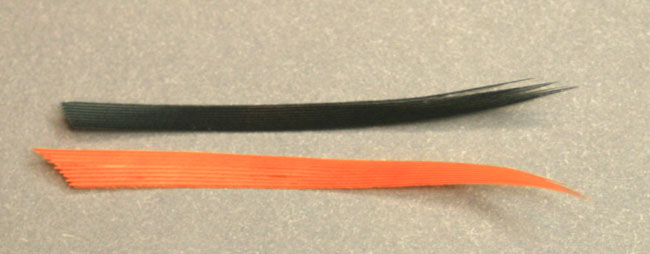
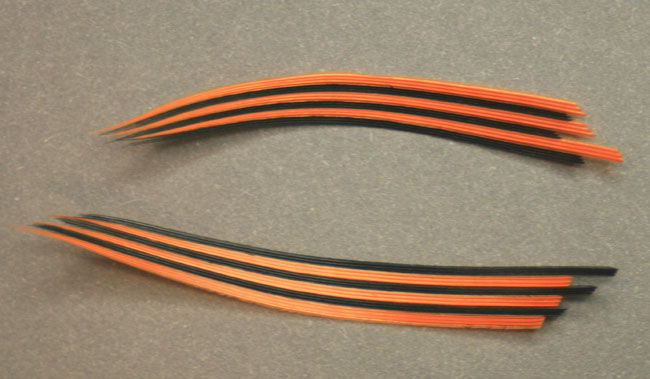
The next step is to make the married wings. This can be tedious but it is not hard. For this type of fly I usually use goose shoulder feathers. They are cheap, come in a shit-pile of colors and marry quite well. You can also use turkey or swan but it is hard to get turkey in a good variety of colors and good swan is very hard to find.
For this fly I am going to make the wing black and orange. Select two feathers, one black and one orange in this case, with fibers sufficiently long to make your wing. The wings on spey type flies are usually not longer than the body of the fly. The fibers should be slightly longer than this so you have enough length to tie them in.
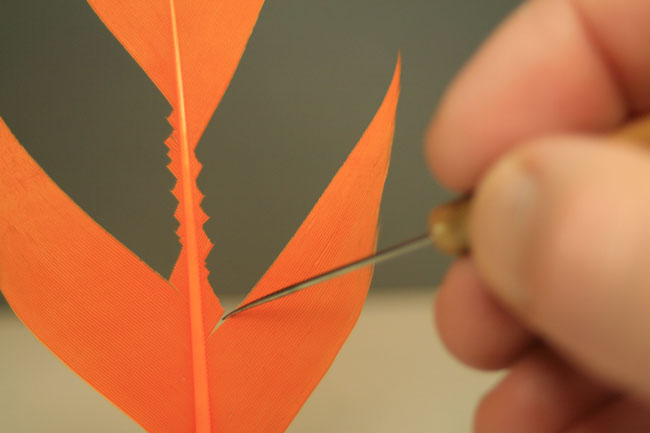
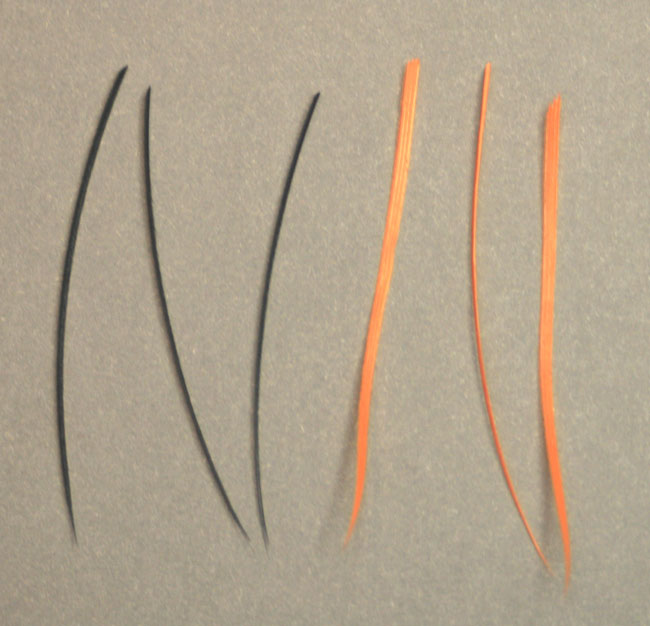
The wing width should be about half the width of the hook gap. In this case about 18 to 20 fibers wide. I am using a dubbing needle to count out the fibers, 9 from the orange and 9 from the black, giving me a width of 18 fibers. Using this method will give me a near perfectly matched set of wings.

Make sure you do the process for both wings of the fly.
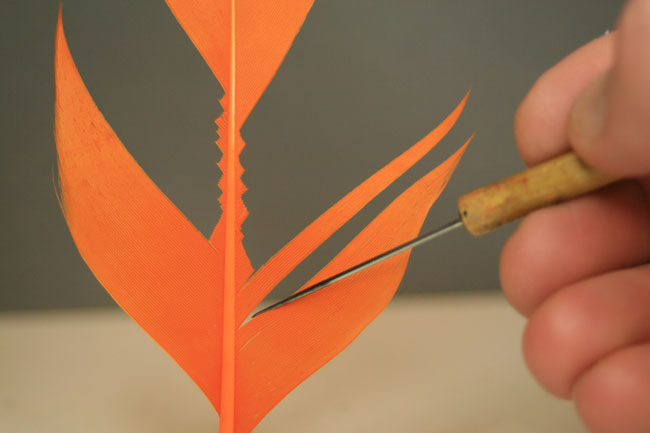
Next I am going to split the fibers up again with the dubbing needle. This time into three sets of three fibers.
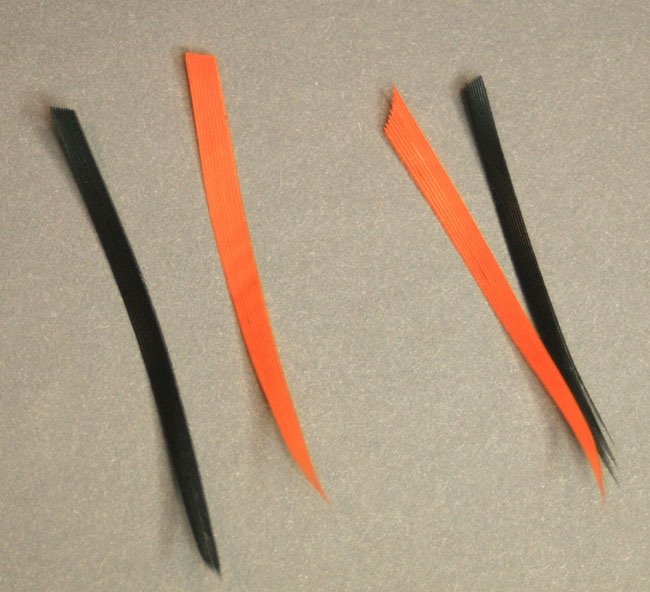
Next grab two of the feather slips, one black and one orange, and set them one on top of the other edge to edge as shown.
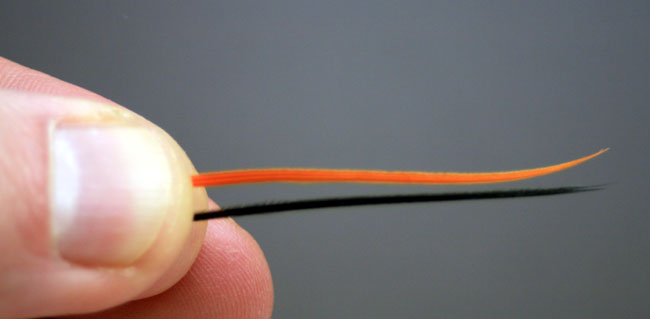
Stroke the slips together with the thumb and forefinger of your other hand. The fibers have small microscopic hooks on their edges that hold them together. These same little hooks should grab each other and hold together.

Repeat the process with the rest of the slips until you have used them all up.
Make sure you pay attention to the end of the wing. The fibers should taper slightly from top to bottom. If you don’t like the way they line up you can re-split them and try again.
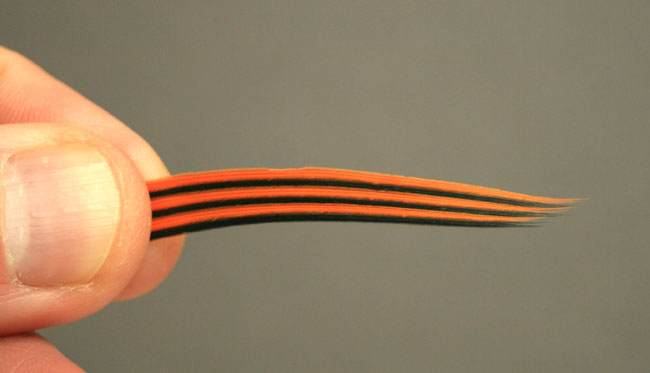
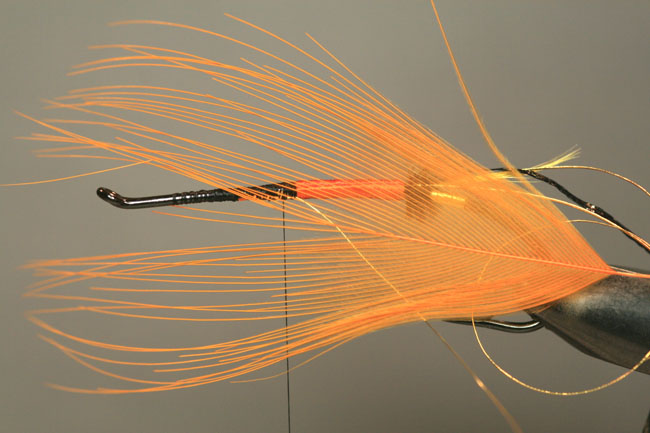
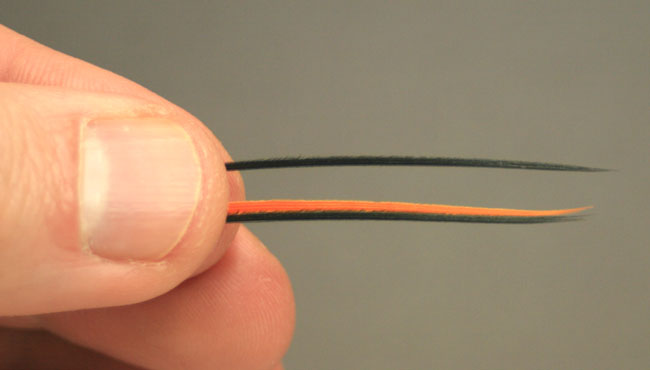
This is the finished set of wings.
They looked a bit narrow to me so I cut three more black fibers per side and added them on for good measure.

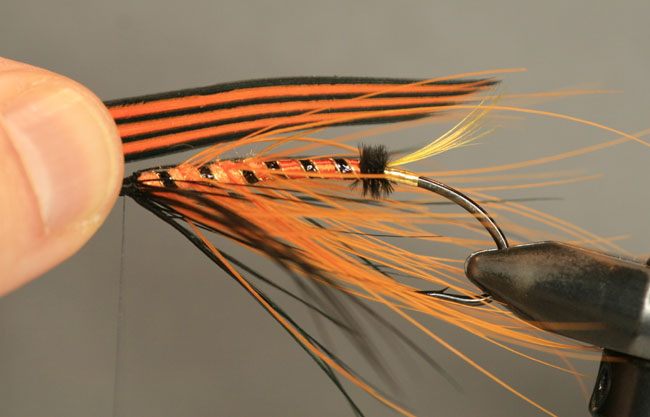
Next we will need to tie in the wing. This is probably the only part of making this fly that is difficult and may require some practice. If you have never done it before I would recommend cutting some plain “unmarried” wing strips and practice tying them in. When you feel you have the process down, take off the practice wings and do it with the married ones.
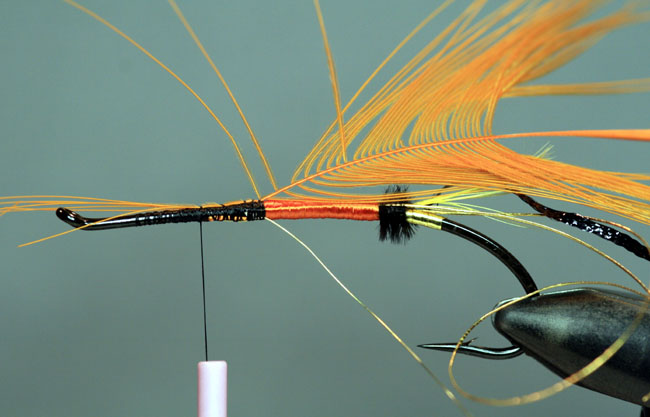
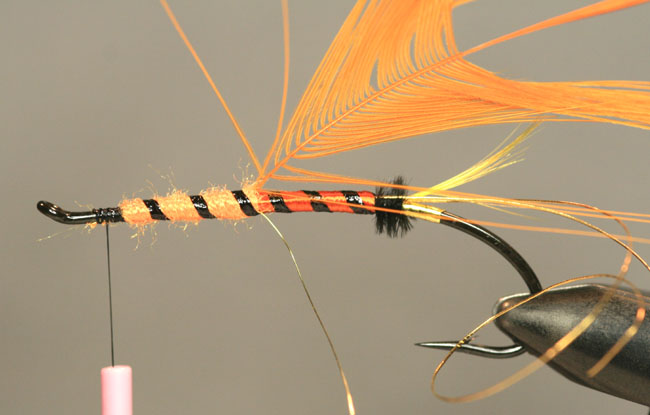
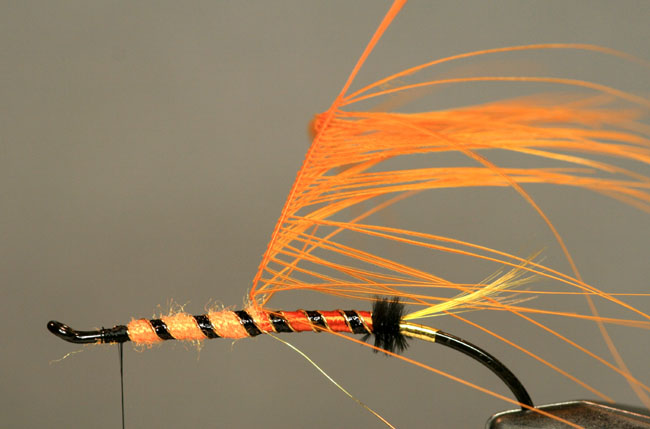
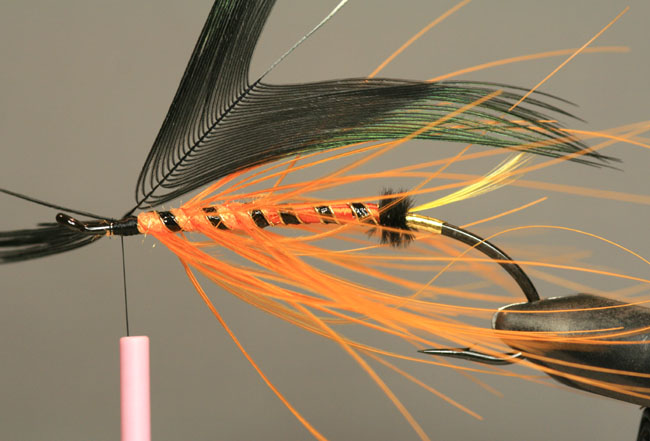
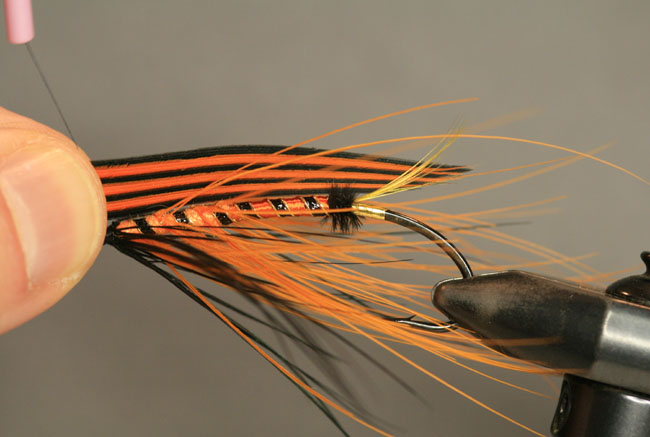
So to start, place your two wings back to back between your thumb and forefinger with the concave sides facing each other. Then hold them on top of the fly as shown
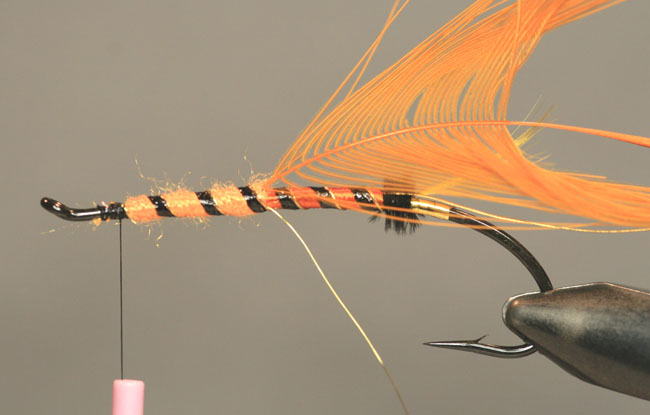
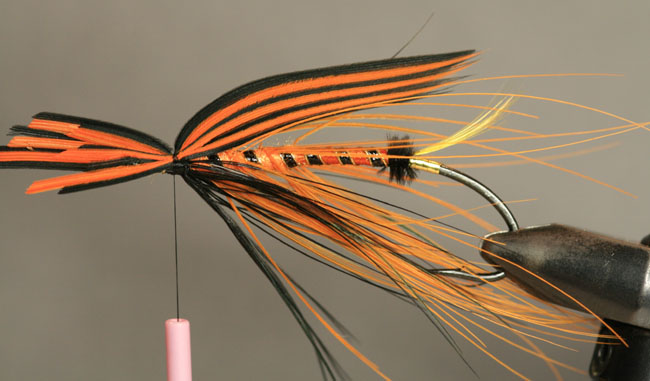
Bring the tread up over the top of the wing.
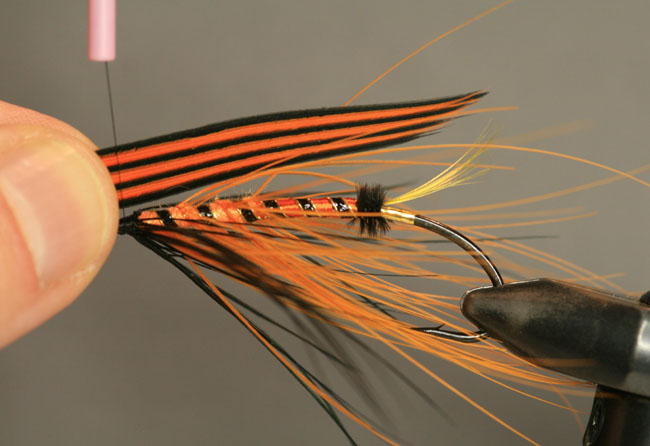
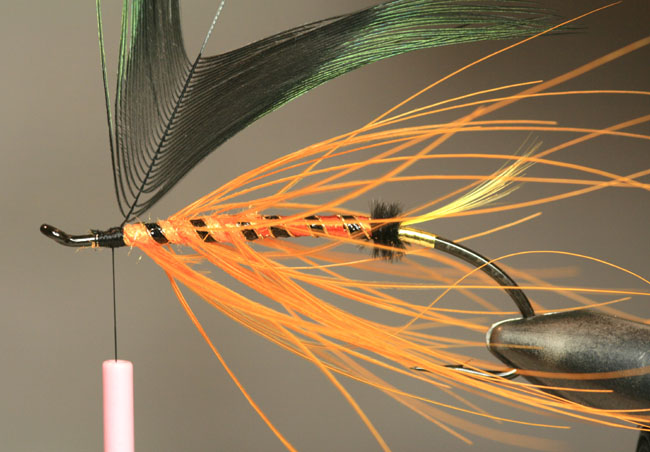
Catch it in between the wing and your finger and bring it down on the far side of the wing catching it between the wing and the finger on the other side.
Draw the thread strait down so the thread crushes the wing fibers strait down on top of one another. Use your thumb and finger that are holding the wing to keep the wing fibers from rolling over to the left or right of the fly. Once the wing is set apply a few raps of thread to lock it in place.
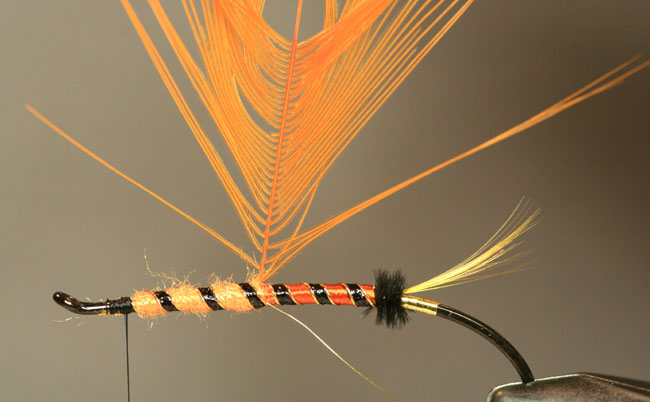
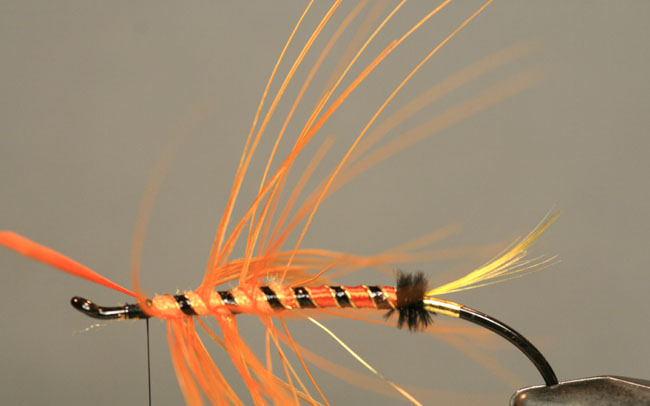
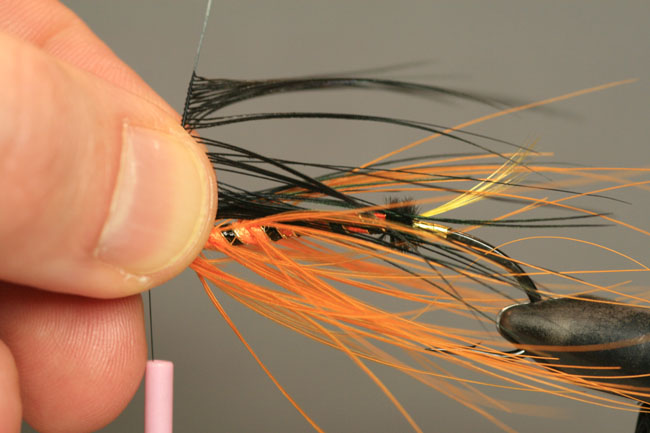
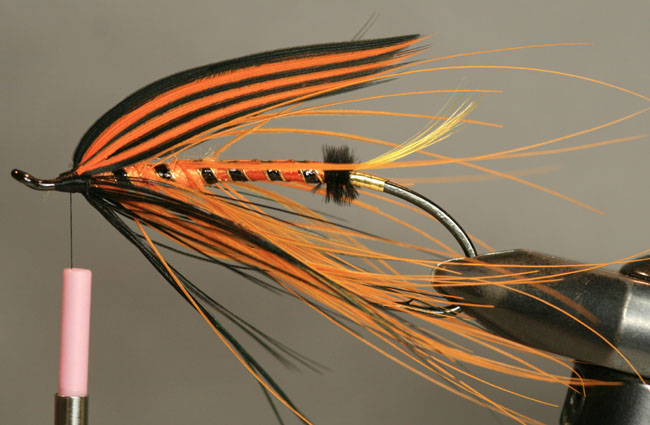
Trim the excess butts of the wing.

Then apply more thread to bind the wing down
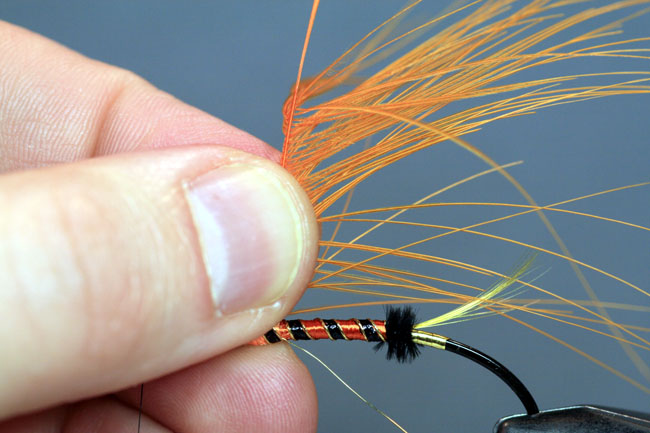
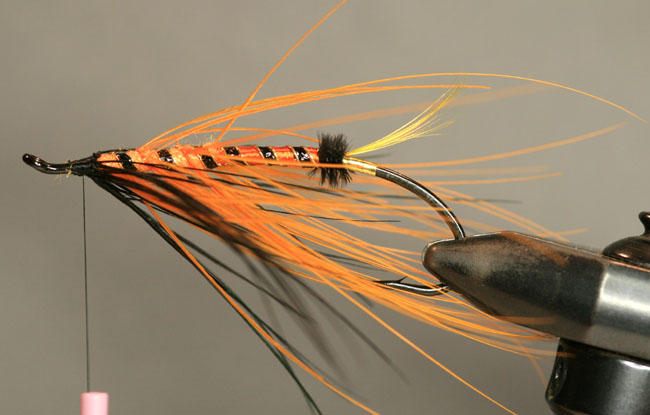
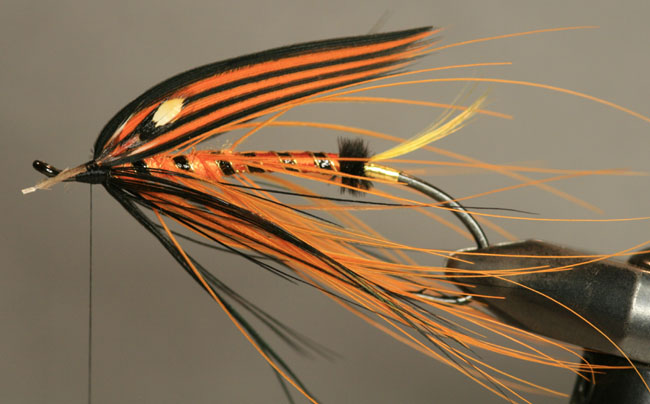
Tie in a jungle cock eye on either side of the wing (optional). Note: If the wing is slightly screwed up at the tie in point the jungle cock can be used to hide the flaw.
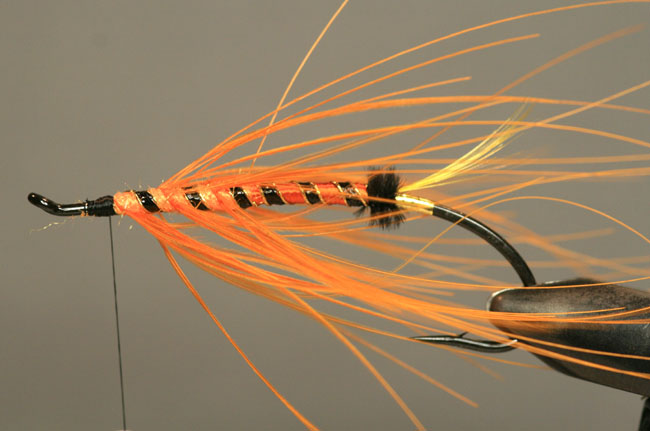
Apply enough raps of thread to finish the head nice and evenly then whip finish the head.
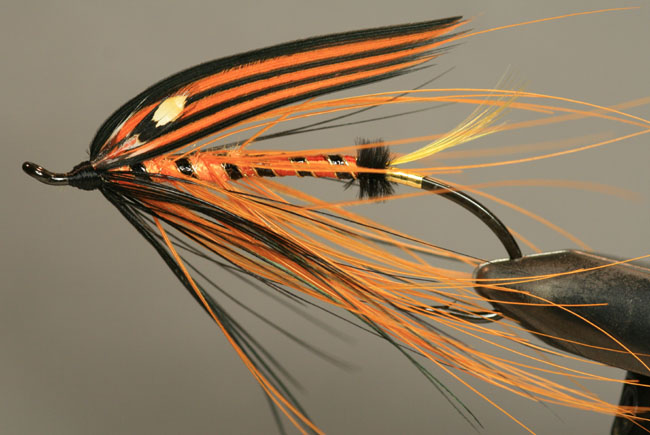
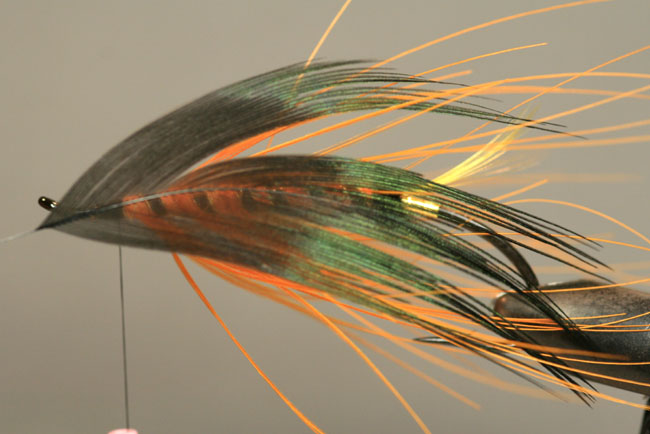
Apply several coats of head cement and this is the finished fly.
Start some thread on a hook. I like the Alec Jackson hooks for this type of fly. This one is a size 1.5.
Run the thread back to the hook point and tie in some flat gold tinsel
FlickrRap the tinsel foreword, tie it off and trim the excess.
Tie in a golden pheasant crest for the tail. Note: The crest should not extend past the bend of the hook.
Tie in some black ostrich herl and rap a short butt.
Rap the thread to the front of the fly binding down the rest of the ostrich herl and trim off the excess. Doing this should eliminate small lumps in the body of the fly were the material is cut off.
Next tie in the rib material. I am using a multi part rib made up of black flat braid and a piece of oval silver tinsel on either side of it. Again run the material the entire length of the hook to avoid lumps.
Next tie in some orange floss for the rear half of the body.
Now tie in some flat silver tinsel for an underbody and rap it half way up the hook shank. This tinsel underbody will help keep the floss bright when it gets wet.
Next rap the floss over the tinsel and tie it off
Tie in a piece of fine gold wire. This will be used as a counter rib across the body hackle to keep fish from chewing it off.
Next select a hackle for the body. In this case I am using a blue eared pheasant feather dyed orange. Ring neck rump feathers also make very good spey hackles if you can find big ones.
Stroke the fibers of the feather back and tie it in by the tip. And clip off the excess.
Tie in some fine orange wool yarn for the front half of the body, rap it foreword, tie it down and trim off the excess.
Next rap the black flat braid foreword, tie it off and trim the excess.
Now rap the oval gold tinsel foreword, one strand tight to the front edge of the flat braid and one tight to rear edge of the flat braid. Bind them down and trim the excess.
Next grab the body hackle by the stem and hold it straight up.
Stroke the fibers in the direction of the back of the hook and pinch them so they stay that way.
Now rap the hackle towards the front of the hook keeping it between the rib, tie it off and clip off the excess stem.
Select a black hackle for the throat. This one happens to be a ring-neck pheasant rump feather dyed black.
Stroke the fibers of the feather back and tie it in by the tip. And clip off the excess.
Next grab the body hackle by the stem and hold it straight up.
Stroke the fibers in the direction of the back of the hook and pinch them so they stay that way.
Rap the hackle, bind it down and trim the excess stem.
Pull the fibers in a downword direction so that most of them are on the sides and under the fly.
The next step is to make the married wings. This can be tedious but it is not hard. For this type of fly I usually use goose shoulder feathers. They are cheap, come in a shit-pile of colors and marry quite well. You can also use turkey or swan but it is hard to get turkey in a good variety of colors and good swan is very hard to find.
For this fly I am going to make the wing black and orange. Select two feathers, one black and one orange in this case, with fibers sufficiently long to make your wing. The wings on spey type flies are usually not longer than the body of the fly. The fibers should be slightly longer than this so you have enough length to tie them in.
The wing width should be about half the width of the hook gap. In this case about 18 to 20 fibers wide. I am using a dubbing needle to count out the fibers, 9 from the orange and 9 from the black, giving me a width of 18 fibers. Using this method will give me a near perfectly matched set of wings.
Make sure you do the process for both wings of the fly.
Next I am going to split the fibers up again with the dubbing needle. This time into three sets of three fibers.
Next grab two of the feather slips, one black and one orange, and set them one on top of the other edge to edge as shown.
Stroke the slips together with the thumb and forefinger of your other hand. The fibers have small microscopic hooks on their edges that hold them together. These same little hooks should grab each other and hold together.
Repeat the process with the rest of the slips until you have used them all up.
Make sure you pay attention to the end of the wing. The fibers should taper slightly from top to bottom. If you don’t like the way they line up you can re-split them and try again.
This is the finished set of wings.
They looked a bit narrow to me so I cut three more black fibers per side and added them on for good measure.
Next we will need to tie in the wing. This is probably the only part of making this fly that is difficult and may require some practice. If you have never done it before I would recommend cutting some plain “unmarried” wing strips and practice tying them in. When you feel you have the process down, take off the practice wings and do it with the married ones.
So to start, place your two wings back to back between your thumb and forefinger with the concave sides facing each other. Then hold them on top of the fly as shown
Bring the tread up over the top of the wing.
Catch it in between the wing and your finger and bring it down on the far side of the wing catching it between the wing and the finger on the other side.
Draw the thread strait down so the thread crushes the wing fibers strait down on top of one another. Use your thumb and finger that are holding the wing to keep the wing fibers from rolling over to the left or right of the fly. Once the wing is set apply a few raps of thread to lock it in place.
Trim the excess butts of the wing.
Then apply more thread to bind the wing down
Tie in a jungle cock eye on either side of the wing (optional). Note: If the wing is slightly screwed up at the tie in point the jungle cock can be used to hide the flaw.
Apply enough raps of thread to finish the head nice and evenly then whip finish the head.
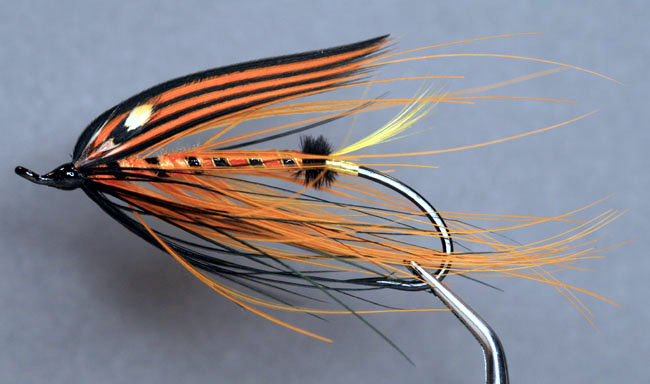
Apply several coats of head cement and this is the finished fly.